


I even made my own envelope that I was pretty proud of!!


 and I wanted to show the detail of the embossing. I want to give credit to the double embossing lining up perfectly to the fact that acrylic stamps rock!!! I would have never been able to do it with a traditional stamp and would have lost my mind trying :P
 Spec #2: Black paper, fold on 1/3 with purple mulberry paper over flap, 2 jewels

 Spec #4: Black paper, triangle gatefold with punched holes and maroon ribbon tied through, inside has white overlay.
 Spec #5: Black paper, gatefold with punched holes and maroon sheer ribbon tied through.
 Spec #6: White paper, gatefold with purple mulberry accent, and black ribbon tied around entire invitation.
 Spec #7: Black paper, gatefold with maroon sheer/satin ribbon tied around entire invitation.
 Spec #7 inside: natural fiber paper matted with maroon. (Tested paper successfully in printer!!)
 Spec #8: Black paper, double-gatefold (gatefold with flaps) with maroon ribbon tied around entire invitation.
 Spec #8 inside: white overlays on panels, minus the "flap" panels.


 This super cute bird stamp by Inkadinkado is sooo cute...I will definitely get a lot of use out of this one!

I will give a quick run through of the types of pages within!! I would love to share every page (which I did take a picture of), but there are 70 pictures. On the inside cover I used a large 7 Gypsies sticker and punched animals from the Making Memories Jack line. Each notebook journal page was cut with either a border punch or a decorative scissor. This page was designed for the mother-to-be to talk about the journey into her pregnancy!!
For the next page I found a sticker that fit the tone of the book!!
Next is a small paper bag that holds a journal tag/card. This is a great place for her to place her OB's business card and maybe a note of how she came to choose that doctor.
Each page with a solid color cardstock was designed to adhere photos or mementos to. In the back of the book I supplied clear photo corners to make it quick and easy to add ultrasound photos in a flash!!!
This is a "pocket" page where journal tags are tucked within. It is another pattern from the Making Memories Jack line and has stars cut from the page revealing a teaser of the tags within.
I pulled the tags 1/2 way out so you can see their design. I stamped them with Autumn Leaves "Doodle Tagged" acrylic stamps, chalked the borders and then tied on the super cute American Crafts ribbon in tons of bright patterns!
You can see the stitching from the "pocket" page better on the backside! I put the 2 patterned cardstocks together with the patterns facing out, and sewed up 3 of the sides!


I found some "pregnancy" vellum stickers that even matched the colors of my cardstock!
These cute tabs separate the journal into trimesters! I attached them with complimentary colored eyelets.
After each trimester tab I inserted calendars for her to fill out. This is a great place to mark Dr. appointments and pregnancy milestones (i.e. felt first kick, found out sex of baby, had craving for ? food, etc.) that she may want to remember later.
More cute patterned paper and notebook paper.
On some of the solid cardstock pages I attached a couple of mini binder clips to hold papers or photos with. 
Again I used a piece of the left over polka dot cardstock to use as an art element. I punched 3 holes in it with the same scalloped Martha Stewart punch that I used to cut the animals out. I think a couple photos behind the circles and maybe a journaled word like "love" or "baby" would look cute through the holes!!!
More super cute journaling pages and a new trimester tab! The look of the pages after each trimester tab are pretty similar to all the previous ones, but I mixed up the color combinations and patterns to edges of the notebook pages.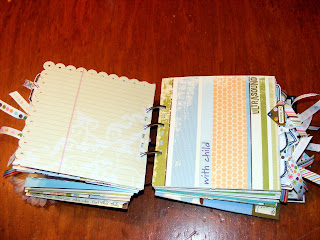
I will skip to the very end of the book where I created a pocket that holds all the extra journaling tags, clear sticker photo corners and things. I also included the left over 7 Gypsies stickers that I did not use, so that she may add them to the pages as she likes! The jumbo paper clip keeps everything from falling out.
This is a picture of the tags, photo corners and extra calendars.
As much as us Mommies like to think that these special moments will be locked in our memories forever......the memories DO unfortunately fade. That is why it is so important to take notes, write the quotes from things people have said, thoughts you may have had, good advice and even the "not so good" advice too! You will thank yourself later for it!

