Showing posts with label scrapbook. Show all posts

Thursday, March 12, 2009

Pregnancy Journal

I had such a blast making this adorable pregnancy journal for someone special!! It is 6x6 and full of notebook lined pages for tons of journaling, calendar pages for tracking dates and memories, and has plenty of room for pictures and even some pockets for keepsakes, appointment reminders and those kind of things. I have the book temporarily bound with 3 jump rings, but when the mother-to-be is finished filling it out I will put the final binding in with my Bind-It-All!! The Bind-It-All is what I used to punch the holes in all the pages.

The pocket pages are filled with tags that have ribbons attached on the ends...ultimately making this book nice and thick!

I will give a quick run through of the types of pages within!! I would love to share every page (which I did take a picture of), but there are 70 pictures. On the inside cover I used a large 7 Gypsies sticker and punched animals from the Making Memories Jack line. Each notebook journal page was cut with either a border punch or a decorative scissor. This page was designed for the mother-to-be to talk about the journey into her pregnancy!!


For the next page I found a sticker that fit the tone of the book!!


Next is a small paper bag that holds a journal tag/card. This is a great place for her to place her OB's business card and maybe a note of how she came to choose that doctor.


Each page with a solid color cardstock was designed to adhere photos or mementos to. In the back of the book I supplied clear photo corners to make it quick and easy to add ultrasound photos in a flash!!!


This is a "pocket" page where journal tags are tucked within. It is another pattern from the Making Memories Jack line and has stars cut from the page revealing a teaser of the tags within.


I pulled the tags 1/2 way out so you can see their design. I stamped them with Autumn Leaves "Doodle Tagged" acrylic stamps, chalked the borders and then tied on the super cute American Crafts ribbon in tons of bright patterns!


You can see the stitching from the "pocket" page better on the backside! I put the 2 patterned cardstocks together with the patterns facing out, and sewed up 3 of the sides!

On this page I used a small left-over piece of the polka dot paper (used on the cover) to create a fun laced edge over the next page.

I love the pre-cut journal pages I found at my local scrapbook store! They are 12x12 so I was able to make 4 pages out of each one!

I found some "pregnancy" vellum stickers that even matched the colors of my cardstock!

These cute tabs separate the journal into trimesters! I attached them with complimentary colored eyelets.


After each trimester tab I inserted calendars for her to fill out. This is a great place to mark Dr. appointments and pregnancy milestones (i.e. felt first kick, found out sex of baby, had craving for ? food, etc.) that she may want to remember later.


More cute patterned paper and notebook paper.


On some of the solid cardstock pages I attached a couple of mini binder clips to hold papers or photos with.

Again I used a piece of the left over polka dot cardstock to use as an art element. I punched 3 holes in it with the same scalloped Martha Stewart punch that I used to cut the animals out. I think a couple photos behind the circles and maybe a journaled word like "love" or "baby" would look cute through the holes!!!

More super cute journaling pages and a new trimester tab! The look of the pages after each trimester tab are pretty similar to all the previous ones, but I mixed up the color combinations and patterns to edges of the notebook pages.
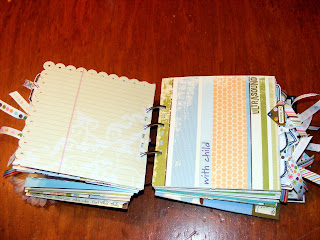
I will skip to the very end of the book where I created a pocket that holds all the extra journaling tags, clear sticker photo corners and things. I also included the left over 7 Gypsies stickers that I did not use, so that she may add them to the pages as she likes! The jumbo paper clip keeps everything from falling out.

This is a picture of the tags, photo corners and extra calendars.

As much as us Mommies like to think that these special moments will be locked in our memories forever......the memories DO unfortunately fade. That is why it is so important to take notes, write the quotes from things people have said, thoughts you may have had, good advice and even the "not so good" advice too! You will thank yourself later for it!

Friday, August 15, 2008

Just for my neighbors!!

My neighbors have the cutest two little girls and I couldn't help but make them a scrapbook page after I was given a couple pictures of them!! They are both 6"x4" perfect for printing and slipping into a brag book!
Techniques: I layered 3 frames over the picture (wooden, green flowers, and twigs), added drop shadows to 2 of the frames and bracket, added a flower in her hair and then lightened it and desaturated it until it matched the lighting on her forehead.

Supplies: Angel Of Mine Freebie Kit by Lori; Allembert, and Bookman Old Style fonts.

Techniques: I lightened and lightened the saturation and color on the photo. I added an outer glow and drop shadow to the title of the page.

I have a ton of projects that I am working on and getting ready to start....arggh if I just could complete a few of them to get em' up here....you'll know when they are done though...I promise!!

Thursday, August 14, 2008

I'm Gettin Digi with it!!

I kind of stole the title of my post from the T-shirt a scrapbook store retailer gave me...I think you can see it in this post here or just scroll to the "Feeling" some Love post below.

You may have noticed I have posted a few digital products recently. Well it was only a matter of time before I became addicted to this. And with GoDigitalScrapbooking having a free daily download every day...how can I not afford to do a quick digital page every day!!! The problem is I want a bigger hard drive...ooooh or a server, ah that would be awesome! But we can all dream right? Speaking of dreaming, I stopped by Office Max yesterday and they had a computer I WANTED. It was an HP 22" touch screen oh, wow, me and the girls had fun playing with it!!! It was HUGE and so fun to touch the screen...I wonder how doing graphic design would be with it?? I could draw items with my finger!! Hehee, that thought makes me giddy!


Here is todays Free daily download at GDS (Go Digital Scrapbooking)! The only thing I had to do was plop the pictures into the 4 holes and I typed all the text....that's it!! If you want to try out digital scrapbooking this is the best way to go! Quick Pages are already put together and all you do is ad the text and pictures. This one normally retails for $1.5o, so even if you paid for it, it would still be cheaper than "regular" scrapbooking!!!

Supplies: Sunkissed Honey Quick Page by Lori Giles at GoDigitalScrapbooking.com; Papyrus, Pristina, Ruritania, and SA-Eckles fonts; and Photoshop Elements 2.0.

I recently made a card digitally for a fellow blogger friend Shelly!! I made it in Photoshop Elements 2.0 printed it out, cut the two pieces apart and adhered it to a blank card. The top section is actuall the inside of the card, and the bottom is the front of the card. You can kind of see the actual card in her post here!! If you have never been to her blog you have to go right now...she makes the cutest tags and cards and has an adorable addiction to owls (hence the theme to the card ;)

Supplies: Bliss of Happiness Page Kit by Verena Karolyi
at godigitalscrapbooking.com; Owl made with DB Animal Occasions font from Scrapnfonts.com; Decaying Kuntry font; Photoshop Elements 2.0.

Techniques: I added drop shadows on the owl and frame to give them more dimension. I also put a Wood pattern overlay and a bevel on the owl.

Do you like to scrapbook digitally? You should give it a try and let me know what you think of it!

Wednesday, August 13, 2008

Busy busy bee!!

For starters, I began making a journal to track my accomplishments each day, in an effort to feel better about myself (since I am an evil critic and killer to my own self esteem). It is a horrible habit that at the end of the each day I reflect on all the things I "DIDN'T" get done and never look at how much I really DID get done.


I got the idea for this wonderful journal from Donna Downey's Blog where she made her amazing art journal. Which mine is Kindergarten grade compared to hers, but I am not naturally artistic (bummer). However I made it work for my own needs...which is just to pick myself up after "I am kicking my @#$ do ya mind?" (movie quote from Liar Liar..hahaha) Sorry I digress...bad tendencies to put in every little detail and thought (still rambling).

So if you go to Donna Downey's website there is a video on how to make this book, and she does a much better job, but this is just a quick rundown. First you take a stack of newspaper and I even used the sale inserts. I used an 8x8 piece of acrylic to hold down over the newspaper and tore the pages into 8x8 pieces. You can tear about 3-5 pages at a time.


Then you use just a plain glue stick to glue about 10 pages together. I went through about 1 glue stick per completed page (3 total) but it could be that they were older and drying out. I like the look of the rugged edges, so I don't line them up "perfectly". What was extra cool is I finally used my brayer, by rolling it on each page after gluing it to get the wrinkles and air bubbles out!!! I have had this for about 3 years and never had a use for it until now!!!

Here is 3 pages (3o sheets of newsprint) all completed, they are nice and thick now, kind of like cardstock.

Donna suggests to paint them first with a white acrylic paint, which I did. Then just add whatever colors you want to your page.
Here are some more painted pages.
And a couple more painted pages.
This is the index or first page in the book. I do not have a cover yet, I would like to get some of that sheet metal like Donna shows on her blog, but we don't have any in town that I know of yet. I will be checking the new art supply store in town later today. I just used my handwriting on the pages with markers.
Here is yesterday's journal page!! I am pretty stoked about it, I know it is kind of boring, but they are just things that I accomplished yesterday written randomly across the page. There are a couple of doodles, but the point is to document my accomplishments. I am sure over time they will get a little more artsy, especially if I don't have a ton of things written down.

Totally cool idea huh!?! Big HUGE thanks Donna for being so creative!!

Next up I downloaded another freebie today at GoDigitalScrapbooking.com and put a 2 page digital layout together. I found the quotes on the internet and used pictures from last months vacation at CJ Strike. It was such a beautiful sunset, I'm glad I had my camera with me!!

Supplies: Natural Inspiration Add-On kit by Verena Karolyi at GoDigitalScrapbooking.com; Pristina font.


And last but certainly not least...I just had to share this awesome pic that I took at the races last weekend. It is the whole Team 49 Racing all together...which let me tell you is a rare shot. I am so proud of all of them, they work so so so stinkin hard on their cars and really...if you ask me...I think they are all very talented drivers. Sniff sniff, Love you guys and I'm so VERY proud of you all even if you don't get the respect you so very well deserve!! So here they are from left to right (which is youngest to oldest) in their I.M.C.A. modifieds; 49S Bobby Steensen, 49C Chris Steensen (my hubby!!), 49T Corey Steensen, and 49K Scott Steensen.


If you are ever near Elko, NV during April-September you have to come watch these guys at Summit Raceway...it's nail biting and butt clenching enjoyment (not kidding) let me tell ya!!

Tuesday, August 12, 2008

Vacation Freebie Template

I found this freebie template for a digital word page in a vacation theme!!! As soon as I was done downloading it, I whipped out last years vacation pics and put these all together in less than a half hour!!!! How cool is that?

The template came from godigitalscrapbooking.com and the direct link to the kit. It was created by Jilly Beans. Isn't that a cute name? I actually saw a license plate here in town that says that....hmm wonder if there is any affiliation or if it is just coincidence?


I also made a card the other day....you ever do something that makes you feel retarded!!! I hope I'm not the only one!! Not telling why, but I made this for someone special!!! I threw all this together with some of my paper scraps....I have a LARGE paper scrap collection, that is pack rat in me again, but hey they are all organized in folders by color. That is organized pack rat...thank you very much :P


Supplies: misc purple scrap papers; purple fibers; purple ink by pretty colors; and swirl alpha stamps by Stamp Craft.

Thursday, August 7, 2008

Tinkerbell and a little decor

I just recently finished this Tinkerbell album which contains pictures that are almost 6 years old.
If you only knew how far behind I am scrapbooking....eek it makes me cringe. OK, so I technically have been a scrapbooker for 9 years (since my first daughter was born), but I haven't had any time to really work on anything between children, work, school and all the normal things that go on in life. So now that I am finally working part time from home, I have the freedom to start to catch up...pheeew!!!

Anyways this is an EK Success accordion album. I think Mya (who was 3 and is now 9) looks so stinkin cute in these pictures dressed as Tinkerbell! Shaylie didn't make a bad ballerina for her first Halloween either! I will more than likely journal on the book soon so that we can remember this all better 20 years from now when they fade from our minds!
If you look super close you may notice that some of the pictures have a seam in the middle where I have digitally overlapped 2 different scans of the album (This is the same for any other 2 page layouts I post). I do not alter the scrapbook in any way when I do this, it is just that I can't scan 2 pages at the same time, so I use Photoshop to seam the 2 scans together!!! Supplies: 6x6 accordion Tinkerbell album by EK Success; and white pom-pom's.
Supplies: Fairy Glow (green), Tinker Bell Phrase and Bubbles paper by Sandylion; Light Perfectly Plum and Dark Pretty Pink paper by WorldWin Papers; blue chipboard flower by Colorbok; yellow/blue polka dot paper flower by Prima; blue sticker button by Button Ups; green and purple ink by Pretty Color; zig-zag deco scissors; pictures printed on Epson R1800; and Scotch ATG 714 tape gun.
Supplies: Fairy Garden (purple), Tinker Bell Phrase and Butterflies paper by Sandylion; Dark Belgium Blue and Dark Luscious Lime paper by WorldWin Papers; pink iridescent paper; purple paper flower by Prima; pink and green button; green embroidery floss; purple fiber; Tinkerbell ribbon charm and purple sheer ribbon by EK Success; green and purple ink by Pretty Color; zig-zag deco scissors; pictures printed on Epson R1800; and Scotch ATG 714 tape gun.
Supplies: Fairy Garden (purple), Tinker Bell Phrase and Butterflies paper by Sandylion; Dark Belgium Blue and Dark Pretty Pink paper by WorldWin Papers; green chipboard flower by Colorbok; Tinkerbell chipboard cut from package (MacGuyver scrapbooking again!); green fiber; green and purple ink by Pretty Color; zig-zag deco scissors; pictures printed on Epson R1800; and Scotch ATG 714 tape gun.
Psst, by the way isn't that an amazing painting in the background? It is about 4'x4'! My Mommy painted it!!! She is sooooooo soooo talented....Mom you should paint more!!!

Supplies: Bubbles, Tinker Bell Phrase and Fairy Glow paper by Sandylion; Dark Luscious Lime and Light Perfect Plum paper by WorldWin Papers; pink and orange chipboard flowers by Colorbok; gem ribbon brad by Oriental Trading; pink rick rack by American Crafts; green and purple ink by Pretty Color; zig-zag deco scissors; pictures printed on Epson R1800; and Scotch ATG 714 tape gun.

Supplies: Fairy Glow (green), Tinker Bell Phrase and Bubbles paper by Sandylion; Light Perfectly Plum and Dark Pretty Pink paper by WorldWin Papers; blue chipboard flower by Colorbok; yellow/blue polka dot paper flower by Prima; blue sticker button by Button Ups; green and purple ink by Pretty Color; zig-zag deco scissors; pictures printed on Epson R1800; and Scotch ATG 714 tape gun.
Supplies: Fairy Garden (purple), Tinker Bell Phrase and Butterflies paper by Sandylion; Dark Belgium Blue and Dark Luscious Lime paper by WorldWin Papers; pink iridescent paper; purple paper flower by Prima; pink and green button; green embroidery floss; purple fiber; Tinkerbell ribbon charm and purple sheer ribbon by EK Success; green and purple ink by Pretty Color; zig-zag deco scissors; pictures printed on Epson R1800; and Scotch ATG 714 tape gun.
Supplies: Fairy Garden (purple), Tinker Bell Phrase and Butterflies paper by Sandylion; Dark Belgium Blue and Dark Pretty Pink paper by WorldWin Papers; green chipboard flower by Colorbok; Tinkerbell chipboard cut from package (MacGuyver scrapbooking again!); green fiber; green and purple ink by Pretty Color; zig-zag deco scissors; pictures printed on Epson R1800; and Scotch ATG 714 tape gun.
Supplies: Bubbles, Tinker Bell Phrase and Fairy Glow paper by Sandylion; Dark Luscious Lime and Light Perfect Plum paper by WorldWin Papers; pink and orange chipboard flowers by Colorbok; gem ribbon brad by Oriental Trading; pink rick rack by American Crafts; green and purple ink by Pretty Color; zig-zag deco scissors; pictures printed on Epson R1800; and Scotch ATG 714 tape gun.
Supplies: 6x6 accordion Tinkerbell album by EK Success; and Tinkerbell ribbon charm and ribbon by EK Success.

I feel like I have gotten a lot done today!! Not only did we look at 9 houses today, but I got these pots done also!! If you look back to this blog entry where I show my scrapbook room you will notice them sitting there on the floor (4th pic down), unpainted. That picture was taken back in January, yes, it is about time I got these blasted things painted!


Supplies: spouncer brushes; paint brush; burnt umber and teddy bear tan by Plaid; and Varnish by Delta Ceramcoat. Yes I only used 2 colors!!!
The leftmost pot I painted with the Burnt Umber and then used a stiff spouncer brush to stroke the Teddy Bear Tan paint on. The middle pot I used a sponge spouncer to but the Teddy Bear Tan on and then I used a paintbrush that had uneven stray hairs on the tip to brush the Burnt Umber up and down about 3 brush widths. I then took the brush and stroked it side to side to give it kind of a denim look. The pot on the right I used the sponge spouncer and dabbed both colors on randomly (both individually and then mixed). I didn't like the look of it enough, so I went back over the whole thing with the stiff spouncer and did the Teddy Bear Tan first and went back over it with the Burnt Umber. I topped them all off with a coat of Varnish to keep the acrylic paint on when they get watered, so now they are nice and shiny!!!

I wanted them to match, but be different. Does this look like something you would buy in the store or does it look totally homemade??? Sometimes it is hard to tell when you made it yourself. What do you think?